Thanks for stopping by. I will be posting about music, media, technology and other fun stuff. Please enjoy and post your comments.

Thanks for stopping by. I will be posting about music, media, technology and other fun stuff. Please enjoy and post your comments.
The Pareto Principle is also known as the 80-20 rule and states that 80% of effects come from 20% of causes. This principle is sited extensively in economics, for example, 80% of collective wealth is held by 20% of the population. 80% of sales revenues come from 20% of clients. It’s not an exact science, but remarkable how often it works. This got me thinking about audio production and the almost endless amounts of equipment available to us and the wide variations in their price. If one piece of gear costs three or four times as much as a similar piece, is it three or four times better? As far as I can tell, the answer is almost always no. In fact, by spending 20% of what a big budget studio spends on similar components, you just might be able to get results that are 80% as good. That is if you’ve got the skills.
The good news here is that almost anyone can make high quality professional recordings without breaking the bank or going into debt. Professional quality audio equipment can be had today for much less than in the past. Much of this price decrease in recent years can be attributed to the shrinking cost of production in Asian factories and increased demand. To be clear, I’m referring to sound quality not build quality. Build quality still has room to grow, but it is improving. There are also improvements to technologies and a bustling clone industry that puts out some surprisingly accurate copies of vintage components for a fraction of the price. So let’s take a look at a few examples of like pieces based on current prices.
Audio Interfaces
Big Budget Studio buys a Lynx Aurora 16 $2,995
Little Guy’s Bedroom Productions buys a Focusrite Saffire Pro 40 $499
Microphones
Big Budget Studio buys a Neumann U87 for $3,199
LIttle Guy’s Bedroom Productions buys a Studio Projects C1 $249
Pre Amps
Big Budget Studio buys a Neve 1073LB $995
Little Guy’s Bedroom Productions buys a Golden Age Pre73 $349
Studio Monitors
Big Budget Studio buys a pair of Genelec 8050A monitors $4,298
Little Guy’s Bedroom Productions buys a pair of Yamaha HS80M monitors $698
Software – DAW
Big Budget Studio buys Pro Tools 9 Native $599
Little Guy’s Bedroom Productions buys Reaper $40
The list could continue on and on… This will surely infuriate lots of folks, especially the ones who’ve gone all in on the top level products. But before you type that hate letter, understand that I’m not trying to say that a pair of Yamaha HS80Ms sound like a pair of Genelec 8050As. They don’t. What I am saying is that if you really get to know your monitors and you are listening in a decent environment, you can get results that are at least 80% as good on the Yamahas. A/D – D/A converter technology has gotten so good over the past few years that it would likely take an experienced audio professional to hear the difference between a Lynx Aurora and a Focusrite Saffire. A Studio Projects C1 doesn’t sound exactly like a Neumann U87, but if you’re working with a great vocalist and you know how to properly mic her, you will get at least 80% of the way there.
So the playing field has been leveled to some degree and the bar is higher than ever. For most of us it’s not worth paying three or four times more for a 10% – 20% gain, but if you can afford it there are compelling reasons to do it. Individually, one top level piece of gear is not going to make a noticeable improvement to your productions, but when you start adding many small gains together it can give you that 10% – 20% overall improvement and bring your productions to a higher level. Still, having all of the finest gear in the world won’t get you a top level sound if you don’t know how to use it properly and if you don’t put in the time to learn the craft. It’s people who produce great audio, not equipment. So don’t worry about the brand name on your equipment or think that you can’t get a professional sound because you didn’t max out your credit cards on gear. Put up some acoustic treatment in your listening area, learn good mic techniques, read up on signal flow and practice, practice, practice…
PVC Pipe/Fittings ($20)
PVC Glue ($5)
Straps ($12)
Auralex Mineral Fiber ($20)
Fabric ($12)
Total $69
INSTRUCTIONS
BUILDING THE PVC FRAME
First determine the size of the surface that you will be building for. In this case it was a 2′ x 4′ Auralex mineral fiber panel. This is being used mostly for recording vocals so I wanted it to sit higher up off the ground to block out room reflections.

The base of the legs use a “double tee” with two 90 degree elbows attached.

The base of the surface uses a “sanitary tee” which allows you to run the pipe across horizontally and continue running the pipe vertically to the top.

One more set of 90 degree fittings are used to complete the top corners.

Now that you have the structure built the tricky part is getting the mineral fiber to stay in place. I had good luck using a couple of light-load straps that I found for a few dollars each at the local home improvement store
CUTTING PIPE – I had access to a miter saw which made cutting the pipe lengths really easy. You can also use a Sawzall or similar. PVC cutting tools can also be found at your local hardware store. When measuring the pipe for your surface be sure to account for 3/4′ on each side where the pipe inserts into the fitting. For my two foot horizontal run I cut a length of pipe 25.5 inches. Also, be aware that PVC pipe is toxic when heated up so work in a ventilated room and use a mask.
GLUING – Make sure that your pipe ends and fittings are clean and be aware that PVC glue dries very quickly.
Finally, measure around the frame for the fabric then cut and sew it into a large pillow case. Slip it over the top and your gobo is complete.

* I was able to locate some Auralex mineral fiber panels for sale Craigslist which brought the cost of the panel down to around $5. As an alternative, you could try some other rigid insulation boards that can be found at a home improvement store. They may not be quite as effective but still do the job.
The amount of flexibility in the modern recording studio is nothing short of mind blowing. Although most engineers probably don’t welcome the phrase “we can fix it in the mix”, many will take full advantage of the tools at hand to make improvements after tracking when they are called for. One great way to improve the sound of a guitar or bass track or just to switch it up is by re-amping it. The concept is dead simple; take a recorded track in your project, play it back through a new signal chain and re-record the results onto a new track. The idea is not new, but re-amp devices made today are specially designed to convert the low impedance signal from your audio interface to a high impedance signal needed for properly interfacing with electric guitar or bass through effects pedals and amps. This is most effective when you start with a clean track. For that reason, I like to record a separate clean output track from the DI so that it can later be re-amped if desired. Here’s how it works.

On a recent recording date we recorded the bass direct through a DI and were satisfied with the sound. But when mixing we found that there just wasn’t enough to fill out the lower end of the mix. It was missing something. We tried different EQ and compression settings and virtual amps but they weren’t really doing the trick. We wanted to get some of that “pump” that happens when air is being pushed from a speaker and captured with a microphone. Re-amping was the answer. The direct track was played back through a Radial RMP-Pro re-amper into a Markbass CMD 121P bass amp and we used an AKG D112 microphone to record the amp.
Listen to the examples below.
Sometimes going direct only with the bass is sufficient. In this case we were wishing that we had also captured the sound of a bass cabinet with a microphone. Luckily we were able to do just that by re-amping. Another scenario might be if a guitarist decides later that he or she isn’t pleased with the sound that was captured from the amp on the original takes. No problem, it can be replaced. Maybe they would like to double the track with a slightly different amp sound. Or maybe there was a rattle or buzz in the guitar track that went undetected on the original recording. This can easily be remedied by re-amping.
In this blog post I will show a modern studio setup that doesn’t require a mixing console.
Building a studio from the ground up over the past couple of years not only gave me the opportunity create a custom design, but also to reconsider my equipment and ways to improve the layout. With a space smaller than a typical commercial studio, maximizing every inch was crucial. The studio we designed takes advantage of many great modern-day components including several that sit on the desk, along with the classic studio mainstays of analog equipment in the racks including pre-amps, compressors, interfaces, and effects processors. The one large piece to this design puzzle that didn’t fit was a mixing console. I had to have a mixing console, right? All studios require them, don’t they? The more I thought about this the more convinced I became that a mixer just wasn’t necessary. And besides, I didn’t want to give up the desk space. With a lot of head scratching and some research we came up with a plan that would use a combination of standard 1/4 inch TRS and XLR patch bays in the rack which would give us all of the routing flexibility we needed and an easy way to get around.
The key component I found to replace the mixing console was the the XLR patch bay. This was something that I hadn’t ever seen before, but was thrilled to learn that they exist. The unit I’m using is a Hosa PDR-369 . This takes the 12 XLR inputs from my snake one the back side and allows me to patch them through on the front to a Neutrik NYS-SPP-L 1/4 inch patch bay. I/O from the interface, pre-amps and effect processors are set up in the rear of the Neutrik patch bay so it’s just a matter of patching the correct channel from the snake to the pre-amp of choice and then to the interface input on the front. Patch bays require cables. Lots of them. I purchased mine in volume through monoprice.com. They are good quality cables and their prices are really low. An even better option would be to make your own cables.

The most difficult part of this arrangement was coming up with a sensible patch bay scheme. Here’s how it worked out;

This shows the basic setup of the patch bays. This allows complete flexibility to patch any input from the snake into any preamp and patch additional outboard processing into the chain.
This TRS patch bay is pre-configured in “half-normalled” mode with the normalled circuit in the back and a grey or white jack in the front that breaks the normallled connection when a plug is inserted. This turns it into “Isolated” or “Thru” mode. Because this setup uses isolated mode by default it made more sense to flip the PCB boards for each channel. This means that inputs and outputs patched into the back would now be mirrored in the front with no “normal” circuits. This allows for the greatest amount of flexibility between components and safely eliminates the possibility of feedback loops that could damage equipment. Having complete control through front panel access is key to the flexibility of a setup like this one.
***There is one important precaution with this setup. Pulling live cables and mics can cause damage to microphones and equipment so it’s always best to turn off phantom power and control room monitors when making patch changes.
Getting back to the desktop, I employ a few very useful components that I like to have within easy reach at all times. First is a Presonus Central Station. Using this Central Station with the CSR-1 Remote, I have instant access to levels, speaker switching, input switching and a talk back mic. The remote is about the size of my hand. I also keep a Frontier Design Tranzport on the desk for easy transport controls, scrolling etc… also about the size of my hand. In addition, there’s an Apogee Duet, Countour Design Shuttle Pro (for Final Cut Pro) and an M-Audio Axiom 49 keyboard controller all within inches. But most importantly, my computer keyboard and mouse are sitting squarely and ergonomically in front of me. Operating “in the box” and having the keyboard and mouse in a comfortable position makes the process run faster and smoother, especially over time.

So far this arrangement has worked out great. At some point we may need a second patch bay that operates in a more traditional fashion with normalled connections, but as of today this setup has really served us well.
Utilizing the sends in your DAW can really help you to achieve a great mix and take some of the pressure off of your CPU in the process. My favorite use of sends is for applying a single effect to a group of tracks. Drums or background vocals are great candidates for this. These track groups will generally have a similar sound and space within the mix so sending them all to one single instance of say a reverb or delay on a bus can help to glue together the overall sound of the track group, and save your CPU a lot of work.
The example below uses the drum tracks from a recent project. There were seven mics used on the kit including a matching stereo pair of overheads, hi hat, snare drum (top), bass drum and a room mic. Since I’m trying to give the drums their own space, I found just the right reverb setting and used the sends on each track to connect to the reverb bus. This also gives me a lot of control over the entire drum kit and easy access to make global adjustments. In this example we will add a reverb bus to a group of drum tracks and send the drums tracks to this bus. I’m using Logic Pro here but it works similarly in all DAWs.
First you’ll need use an existing bus or create a new one. In Logic, you need to activate the bus from the track send.

Let’s say you select “Bus 3”. It will now appear in the mixer view bus section. Rename that bus “Reverb” and it will now show up in the bus list as “Bus 3 (Reverb)”

Next we will patch in the Reverb on this bus. In most cases you will want to set up bus effects 100% wet and 0% dry. This way, you’re only picking up the effect and not duplicating the actual track signal through the bus.

Now send the rest of your drum tracks to the Reverb bus. You can adjust the level of each track using the knob just to the right of the send (see below). This will send more or less of your track to the Reverb bus. Also, you can make global adjustments to the overall reverb settings or amount on the Reverb bus.

That’s all there is to it. This works great for applying effects like reverbs, delays, chorus etc… You can also use this method for running parallel compression to enhance the overall sound (topic for another post).
 There are so many microphone choices today and even more opinions on which types of mics work “best” for different applications. This post compares the sounds of a drum set recorded with ribbon and condenser overhead microphones.
The most common microphones we see on stage or in a studio are dynamic mics like the Shure SM57/SM58 or condenser mics like the AKG C 414. Less common are ribbon microphones. Ribbon microphones have a rich and fascinating history dating back to the 1920s and it seems that they have come back into fashion lately, especially among audio geeks. What I like most about them is their ability to capture a natural sound. Recently I purchased a pair of Apex 205 ribbon microphones. These are typical budget microphones manufactured in China. Modifying these microphones can greatly improve their sound so I purchased two high quality Ludhal transformers from K&K Audio to replace the stock transformers (more on that that process on a future post). It was a kind of a scary procedure but ended in success. I’ve used these mics for different applications, and one that I especially liked was for drum overheads. It’s more common to see small diaphragm or large diaphragm condenser microphones in this role. Their ability to capture high frequencies well make them a great choice for grabbing the sizzle of cymbals and the snap of the sticks. With ribbon mics I find that there is less high frequency information and a roll off closer to what analog tape gives us. So I’ve been using ribbons and boosting high frequencies where needed instead of using condenser mics and pulling back higher frequencies. Both methods work great, so it’s just a matter of taste.
Below is a comparison of the modified Apex 205s vs. a pair of Nady CM90 small diaphragm condenser microphones. Disclaimer: I’m not a drummer so please excuse the sloppy drumming.
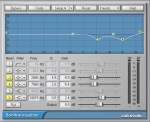
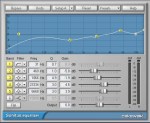
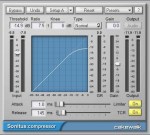
You will hear the ribbons first then the condensers. Four measures for each. EQ and compression added for the effects versions.
Here are the EQ and compression settings that I used. I used a convolution reverb on it’s own bus and settings did not change.
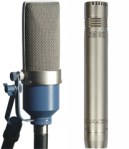
*The Apex 205, like most ribbon mics, picks up sound in a bi-directional figure 8 pattern, i.e. equally from both sides. The CM 90s pick up sound in a cardioid pattern, which rejects much of the sound from the back. Because of this, there will be a noticeable difference in the proximity between the two sets. I don’t believe that this makes it an uneven comparison, but we should keep it in mind.
Now that your final product is complete you need to get it out to the masses. YouTube is the obvious place, but there are other great sites that host videos like Vimeo and Dailymotion. On the topic of optimizing video for best quality on YouTube there seems to be a lot of information out there, many conflicting opinions, some conspiracy theories and lots of voodoo. Here’s what I’ve used and it seems to work well.
H.264 video at original size and frame rate (29.97) with AAC audio at 48 kHz rendering to target bit rate 192 kbps. It will take YouTube a little while to do some encoding on the other end and your video will not look good at first. it was a bout 10 or 20 minutes before it playing in it’s final form.
This is where it all comes together. This for me is the most time consuming part by far. Staying organized and setting things up correctly from the start will be a big help. I am currently working in Final Cut Studio but I have also edited concert footage in Sony Vegas. Both are really great programs. These are the steps:
Capture video
Setup project
Import and sync video
Import final audio mixes
Camera cuts, transitions, edits…
Capture Video. If you were diligent and labeled all of your tapes, this step will be much easier. The one thing that you will need is time. Lots of it. Three or four cameras recording two hours of video each means six to eight hours of real-time capture. Before you start capturing it’s crucial to make sure that your capture settings are correct. Most importantly, if you shot widescreen you may need to capture DV “anamorphic” to avoid having your video look squished. Otherwise you’ll capture standard DV. Also be aware that it will be NTSC in the U.S. and PAL for many other countries (If you’re not sure do some research first).
Setup Project. For DV footage I set the project to “NTSC DV – 720 x 480 – 29.97 fps”. This always works for me.
Import and sync video. This step can be a little tricky. High budget productions use expensive equipment to sync cameras together with time code that many video editing software programs can read. We don’t have that luxury and will need to sync our camera shots manually. This is why I previously stressed the importance of keeping all cameras running until the tape or the show end. Otherwise you will need to re-sync every time a camera stops. The process depends on the software that you’re using, but in general you will need to find a matching point on each camera and mark it. The software will then use that point to align all video clips. In Sony Vegas you can use a great plug-in called Vasst Ultimate. In Final Cut Pro the function is built-in and you will need to mark either an in or an out point and “Make Multiclip”. Even more affordable solutions like Magix Movie Edit Pro now support multiclip video editing. If your software doesn’t support multiclip editing don’t give up. You can still stack your video tracks on the timeline and manually make your edits that way. It’s not as slick and takes a little longer, but it works.
Import Final Audio Mixes. Use the existing audio from one of the cameras to sync the final audio mixes. Zoom in close and look for transients to match up. You could also wait until the very end to fly in the final audio.
Camera cuts, transitions, edits… This is the fun part. Choose your cuts, add transitions, fades, text etc… This is where you can make the video look the way that you want. Maybe you like fast cuts with lots of action, or longer ones with slower transitions. The music may help you to make these decisions. Try out some video effects here as well. Like all effects in audio and video production, it very easy to over-use them so proceed with caution. If you’ve got a good performance, good shots and great sounding audio maybe you don’t need any effects at all. I like to use a little color correction when needed, at least to balance levels.
Once you get your video to look and sound the way that you want you’re ready to deliver it.


